DIY Stenciled Accent Wall Using an Allover Stencil
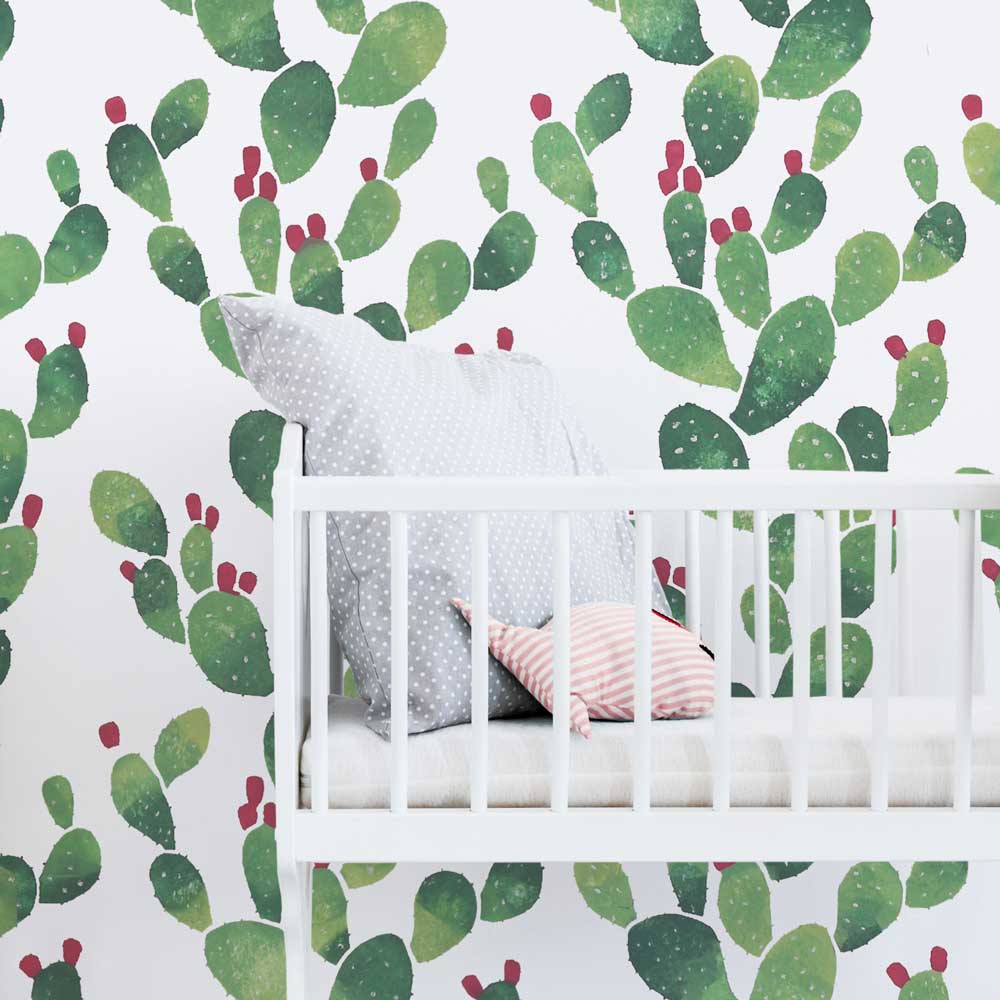
Welcome back, Cutting Edge Stencil friends! We have a fun and trendy project this week created with a simple allover wall stencil! Cacti are all the rage on Instagram, and with a stencil pattern as exciting as this, your home will be the envy of all your friends! The best part? It’s easy and inexpensive! Let’s get stenciling!
The stencil used for this DIY accent wall is the Prickly Pear Allover Stencil. The paints used are Benjamin Moore Aurora Borealis, Vienna Green, Balsam, and Peony. Spray adhesive is optional and can help with reducing paint seepage but, is not necessary. Whether using spray adhesive or not, always use blue painters tape to secure the stencil to the wall.
Lastly, you’ll need two 2” dense foam rollers for transitioning colors, a 3/4" professional stencil brush for the bottom and top edges, and a sponge for blending!
We chose to use spray adhesive to help achieve crisp edges in addition to blue painter’s tape. Simply load and offload the dense foam stencil roller and be sure to coat the roller evenly. The beauty of this stencil project is that you can vary the colors any way you want! You can easily transition from the lightest to darkest color or simply randomize your color selection for a more organic stenciled look!
Dampen your blending sponge with water and wring it out very well before you begin stenciling. The sponge should just barely be wet. Roll the body of the cactus with your 3 chosen stencil colors. While that paint is still wet, place your damp sponge on the body of the Prickly Pear stencil and pounce the sponge up and down, while slightly rotating your wrist for a natural blending of these colors. This will help blend your stencil colors together while also giving the cactus some texture! This stenciling technique may sound difficult but, it’s so easy! Keep pouncing until you’ve achieved your desired look!
Once you’ve finished blending, take a polyfoam brush and dab the pink color onto the fruit portion of the Prickly Pear wall stencil. With a detail brush, pick up a small amount of Benjamin Moore Navajo White and randomly dot all over the body of your stenciled Prickly Pear. This will mimic the needles that Prickly Pears naturally grow! You can add more or less white dots depending on your desired look! This technique is super easy and impossible to mess up! Remember that Prickly Pears are a part of nature and don’t look identical to one another!
While stenciling the bottom portion of a wall may seem difficult, it’s actually painless! Once you reach the bottom of the wall, use a 3/4" professional stencil brush to pounce the paint down towards the baseboard. You can even bend the stencil to make sure the stencil fits into the crease of the baseboard. Simply repeat the blending process with your damp sponge and finish the stenciled cactus with the white dots.
Much like the bottom half of the stencil, the top portion of this DIY stencil project is just as easy! Use the FREE Top Edge Stencil, which is smaller and easier to manipulate for finishing off the top of your Prickly Pear wall! With the 3/4” professional stenciling brush, pounce the paint upwards towards the crown molding. Again, feel free to bend the stencil to make stenciling the top edge of the wall easier! Simply repeat the blending process with the damp sponge and finish the stenciled cactus with the white dots.
Once each section is complete, peel back your stencil design and align it with the previously stenciled parts. This alignment is super easy and makes allover stenciling a breeze! You can even use a clip-on stencil level to help ensure your stencil rows are straight every time!
Check out the video to see the steps in action:
We could not be more OBSESSED with our DIY stenciled accent wall! Cute, trendy, and cheaper than traditional wallpaper, this Prickly Pear stenciled wall is sure to please! Instagram and Pinterest have nothing on Cutting Edge Stencils!
Where would you place this DIY stenciled accent wall? Comment below with your thoughts! Can’t get enough of Cutting Edge Stencils:

 The stencil used for this DIY accent wall is the Prickly Pear Allover Stencil. The paints used are Benjamin Moore Aurora Borealis, Vienna Green, Balsam, and Peony. Spray adhesive is optional and can help with reducing paint seepage but, is not necessary. Whether using spray adhesive or not, always use blue painters tape to secure the stencil to the wall.
 Lastly, you’ll need two 2” dense foam rollers for transitioning colors, a 3/4" professional stencil brush for the bottom and top edges, and a sponge for blending!
We chose to use spray adhesive to help achieve crisp edges in addition to blue painter’s tape. Simply load and offload the dense foam stencil roller and be sure to coat the roller evenly. The beauty of this stencil project is that you can vary the colors any way you want! You can easily transition from the lightest to darkest color or simply randomize your color selection for a more organic stenciled look!
Lastly, you’ll need two 2” dense foam rollers for transitioning colors, a 3/4" professional stencil brush for the bottom and top edges, and a sponge for blending!
We chose to use spray adhesive to help achieve crisp edges in addition to blue painter’s tape. Simply load and offload the dense foam stencil roller and be sure to coat the roller evenly. The beauty of this stencil project is that you can vary the colors any way you want! You can easily transition from the lightest to darkest color or simply randomize your color selection for a more organic stenciled look!
 Dampen your blending sponge with water and wring it out very well before you begin stenciling. The sponge should just barely be wet. Roll the body of the cactus with your 3 chosen stencil colors. While that paint is still wet, place your damp sponge on the body of the Prickly Pear stencil and pounce the sponge up and down, while slightly rotating your wrist for a natural blending of these colors. This will help blend your stencil colors together while also giving the cactus some texture! This stenciling technique may sound difficult but, it’s so easy! Keep pouncing until you’ve achieved your desired look!
 Once you’ve finished blending, take a polyfoam brush and dab the pink color onto the fruit portion of the Prickly Pear wall stencil. With a detail brush, pick up a small amount of Benjamin Moore Navajo White and randomly dot all over the body of your stenciled Prickly Pear. This will mimic the needles that Prickly Pears naturally grow! You can add more or less white dots depending on your desired look! This technique is super easy and impossible to mess up! Remember that Prickly Pears are a part of nature and don’t look identical to one another!

 While stenciling the bottom portion of a wall may seem difficult, it’s actually painless! Once you reach the bottom of the wall, use a 3/4" professional stencil brush to pounce the paint down towards the baseboard. You can even bend the stencil to make sure the stencil fits into the crease of the baseboard. Simply repeat the blending process with your damp sponge and finish the stenciled cactus with the white dots.
 Much like the bottom half of the stencil, the top portion of this DIY stencil project is just as easy! Use the FREE Top Edge Stencil, which is smaller and easier to manipulate for finishing off the top of your Prickly Pear wall! With the 3/4” professional stenciling brush, pounce the paint upwards towards the crown molding. Again, feel free to bend the stencil to make stenciling the top edge of the wall easier! Simply repeat the blending process with the damp sponge and finish the stenciled cactus with the white dots.
 Once each section is complete, peel back your stencil design and align it with the previously stenciled parts. This alignment is super easy and makes allover stenciling a breeze! You can even use a clip-on stencil level to help ensure your stencil rows are straight every time!

 Check out the video to see the steps in action:
We could not be more OBSESSED with our DIY stenciled accent wall! Cute, trendy, and cheaper than traditional wallpaper, this Prickly Pear stenciled wall is sure to please! Instagram and Pinterest have nothing on Cutting Edge Stencils!
Check out the video to see the steps in action:
We could not be more OBSESSED with our DIY stenciled accent wall! Cute, trendy, and cheaper than traditional wallpaper, this Prickly Pear stenciled wall is sure to please! Instagram and Pinterest have nothing on Cutting Edge Stencils!

 Where would you place this DIY stenciled accent wall? Comment below with your thoughts! Can’t get enough of Cutting Edge Stencils: