How To Stencil Planters With Halloween Stencils
A Complete Guide to Stenciling Custom Halloween Decor
Welcome back, stencil friends! Spooky season is in full swing and Cutting Edge Stencils is here to share a super simple DIY project. Today we are going to talk about how to stencil planters with a halloween stencil. Let's get started!

Everything You Need for this Stencil Project
The best part about this project is you are able to utilize supplies you likely already have on hand! Maybe you have some paint leftover from a previous craft project. Do you have a planter that has seen better days? These stenciled cinder block planters are a great example. This is the perfect way to have some fun with a halloween stencil and create something new with little to no cost.
- Terracotta Pots (any size works)
- Folk Art Craft Paints (we used some we already had on hand)
- Modern Masters Metallic Paints (we used some we already had on hand)
- Zinsser Shellac to seal your beautiful work
- Deco Art Pen
- Stencils of your choosing! Craft stencils work best for a project of this scale.
- Stencil Brushes
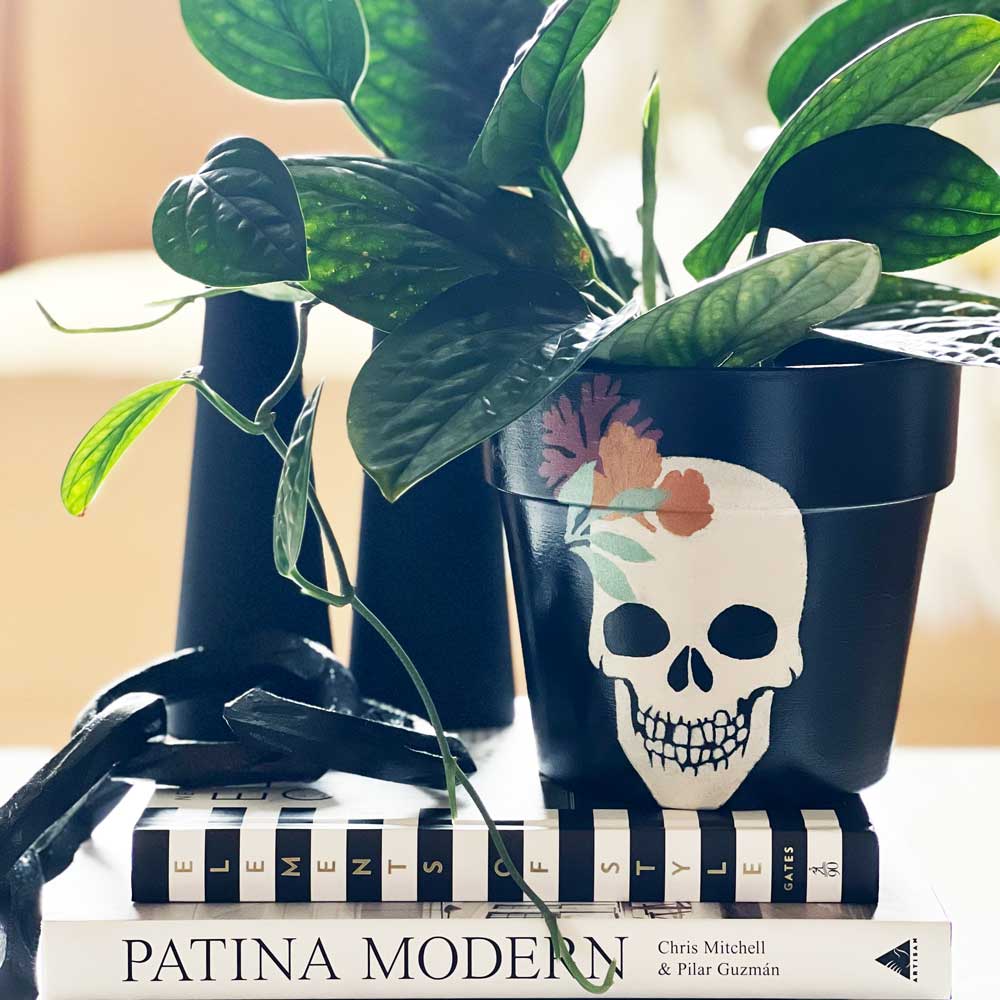
Super Chic Floral Skull Stenciled Planter
First, and most importantly, we need to fully paint our planter, inside and out, with our base color. It is important to paint and seal both the inside and outside of the pot when working with terracotta. Skipping this step will result in the terracotta absorbing excess moisture. This could cause your pot to chip or discolor the paint on the outside of the pot over time. We used Folk Art Licorice in a matte finish for our base color.
Now we stencil! We used the Skull #3 Stencil, size medium, for this design. We painted the first inlay using Folk Art Cottage White (Matte finish). Using very little paint on our stencil brush, we applied our paint in light coats to build up our desired coverage. Our goal was to not make the skull fully opaque.
Next we used the second overlay of the skull to create the eyes. We used the same that was used for our base coat on the pot. You can use a bit of painter’s tape or simply hold your stencil in place.
For this next step, we recycled portions of the Woodland Botanicals stencil. We cut it up and used the flowers and foliage to give the skull a head piece. This is an optional step and you can free hand flowers or omit them all together if you choose. If you have an old stencil on hand, it’s a great way to incorporate something you already have. We love the look the floral elements bring to this design.

To finish, we used Zinsser Shellac to seal both the outside and inside of the pot. It is important to wait for the first coat to dry completely before applying the second coat.
The only thing left to do was to add our plant and find it a home. We love the way this halloween stencil pairs with the black and white decor of this space!
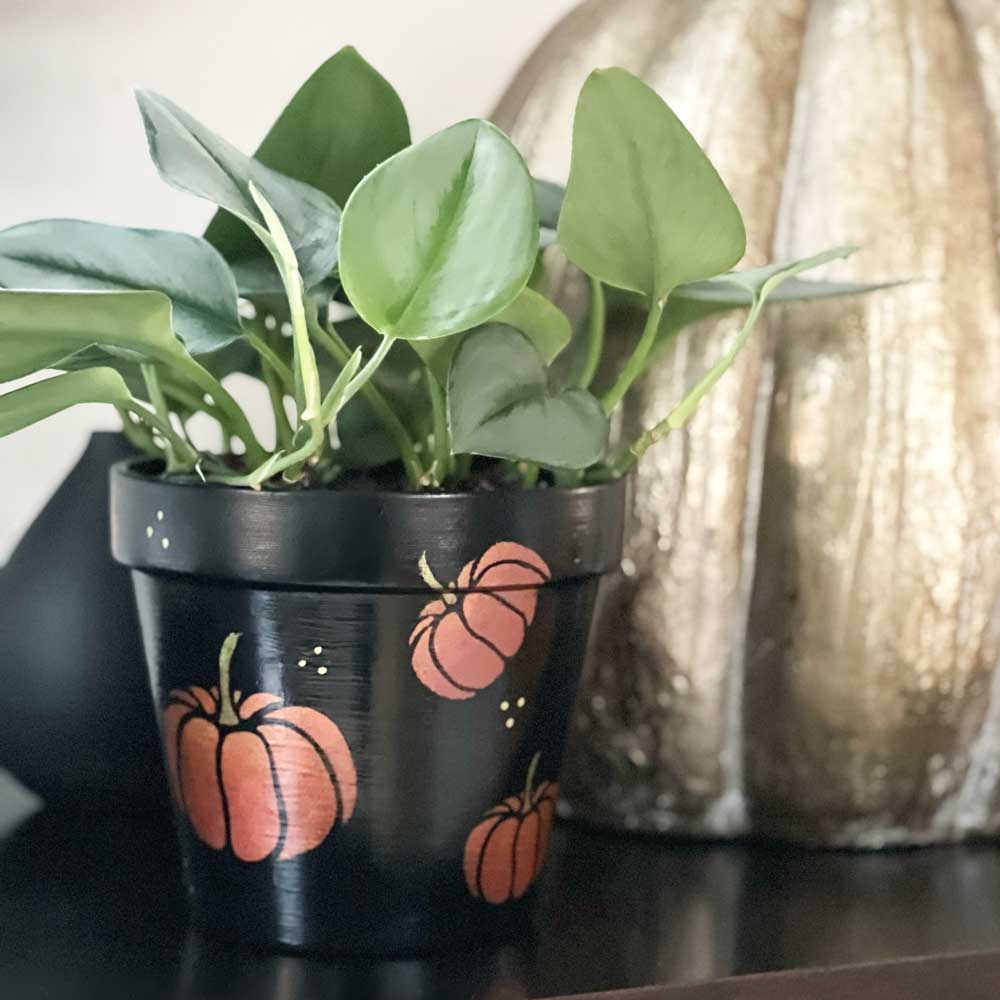
Stenciling the Perfect Pumpkin Planter
This next planter screams “classic fall”. We painted the base coat in Folk Art Licorice (Matte finish). Now for the halloween stencil. We used the Pumpkin Craft Stencil in both the small and medium sizes. Working in tandem with both stencil sizes, we randomly placed and spaced the pumpkins across the pot.

Using a blend of Modern Masters Metallic paints, we filled in our pumpkins. We chose Copper for the center of the pumpkin. Using our stencil brush, we blended with both Plum and Tequila Gold around the edges of the stencil. These rich, vibrant metallics were the perfect way to add dimension to these simple shapes. To finish the pumpkin, we painted the stem with Modern Masters Ivy.
Next, we picked up our Deco Color Paint Pen in black to touch up any mistakes. The Deco Color Paint Pen in gold was great to fill any blank spaces with little details. Seal both the entire pot with Zinsser Shellac to protect your beautiful stenciling.
A Mystical Mushroom Planter Using Stencils
The final stenciled planter uses the Magic Mushroom 3-piece Kit. We also used a different application technique than the other planters. We applied a base coat using the Folk Art Licorice (Matte finish).
Next, we secured the stencil to the pot. We traced the edges of the stencil design using the Deco Color Paint Pen in gold. We then filled sections and added details once the stencil was removed.

Using Deco Color Paint Pen in Black, we touched up any paint bleed and perfected some details. Zinsser Shellac was used to seal the planter, allowing ample drying time between coats. We think it makes an absolutely adorable home to this tiny begonia ice plant.
We love how these turned out!
It truly is a stencil project that can utilize those craft supplies you have collected over the years. It’s a perfect solution for that ever-changing seasonal decor and is a real garden game-changer. It's time to grab your favorite stencil designs and allow your creativity to make something that is uniquely you!
Tell us, which craft stencil would you use on a terracotta pot? Leave us a comment below, we’d love to read your thoughts!
Can’t get enough of Cutting Edge Stencils:
- Check out our Cutting Edge Stencils Facebook Page to see our beautiful customer photos and interact with the people who created them!
- Buy our Tile Stencils or Wall Stencils for your next stencil project, and browse our other wonderful stencil designs
- Follow us on Instagram and Pinterest and share your designs using #CuttingEdgeStencils. We love seeing your projects!
- Feeling inspired? Check out our other Blog posts for more inspo and stencil designs!
Thanks for reading and happy stenciling!
Share this page!


