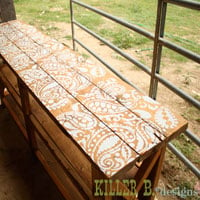
Indian Inlay Stencil Spruces Up Home Decor
How-To Stencil Furniture with Kim Myles' Indian Inlay Stencil!
Are you sick of your boring tabletops? Do you long for romantic furniture that speaks volumes of your home design expertise?
Cutting Edge Stencils can offer you just the fix you need! A while back, we teamed up with Kim Myles to create the
Indian Inlay Stencil kit, and we've received so much love from our customers about this particular stencil! We've been told, and we know from experience, that it looks absolutely TREMENDOUS on table tops! If you don't believe us, check out how our friend Ashley, from the blog
Domestic Imperfections, stenciled her kitchen table with this intricate inlay design!

Here's What She Did
First Ashley sanded down the table like a regular pro while sporting some snazzy protective eyewear! Then she stained the newly sanded wood with two coats of English Chestnut by Minwax. After that was the moment of truth: figuring out how the stencil works! The Indian Inlay Stencil Kit comes as a five piece set: three “border” pieces, one “interior floral” piece, and one small “filler” piece. Really, you can use whatever piece you want wherever you want, so the design can ultimately be painted however you choose for a unique inlay pattern!

Ashley decided to use the "interior floral" piece as her outermost "border." She adhered that piece to the table using painters tape, and then mixed her paint with Pearlizing Medium for a shiny finish. Ashley decided a stencil brush was much more feasible to use for this project than a dense foam roller, but because of this as well as the customizability of the inlay kit, the project took a lot of time and patience!
After tampering with the stencil for a bit, Ashley figured out how to get some nearly perfect corners out of a stencil design that was made to be imperfect. The key to this inlay stencil is to think real hard, don't be OCD, and just make it work! Once you get closer to the center of the table (since you are working from the outside in) you really have to match up the pieces that best fit the space depending on how much room you have left on the table! Varying the pieces is also important as you travel toward the center. These photos show Ashley's steps as she worked from the edge to the middle, adding a layer at a time.

Don't be afraid to reuse portions of one stencil piece in order to fill extra space. It might even be best to plan your design beforehand to make sure everything aligns semi seamlessly. Because of the varying sizes of the stencil pieces, it should be pretty easy to fill the entire space of the table top; you just have to play around a bit and think creatively! Here's a few great images of how Ashley's table turned out!

For more info:
Thanks for reading and watching! Happy stenciling!
Melissa and the Cutting Edge Stencils Crew

 Ashley decided to use the "interior floral" piece as her outermost "border." She adhered that piece to the table using painters tape, and then mixed her paint with Pearlizing Medium for a shiny finish. Ashley decided a stencil brush was much more feasible to use for this project than a dense foam roller, but because of this as well as the customizability of the inlay kit, the project took a lot of time and patience!
After tampering with the stencil for a bit, Ashley figured out how to get some nearly perfect corners out of a stencil design that was made to be imperfect. The key to this inlay stencil is to think real hard, don't be OCD, and just make it work! Once you get closer to the center of the table (since you are working from the outside in) you really have to match up the pieces that best fit the space depending on how much room you have left on the table! Varying the pieces is also important as you travel toward the center. These photos show Ashley's steps as she worked from the edge to the middle, adding a layer at a time.
 Don't be afraid to reuse portions of one stencil piece in order to fill extra space. It might even be best to plan your design beforehand to make sure everything aligns semi seamlessly. Because of the varying sizes of the stencil pieces, it should be pretty easy to fill the entire space of the table top; you just have to play around a bit and think creatively! Here's a few great images of how Ashley's table turned out!
 For more info:


